Run a second unit or split day
Practical ways to lay out second units, split days, and separate shoots
Each day on a schedule holds one call sheet, so the first thing to decide is how many call sheets you need. Start with the setup that matches your shoot:
| Your situation | Best setup |
|---|---|
| A small second unit working the same day, with the same general times and meals | One call sheet, with its own department |
| Two units working the same day, and everyone can share one call sheet | Both units on one color-coded schedule |
| A second unit with its own scenes, times, or locations | A separate schedule |
| A mostly separate shoot, with different crew, scenes, and locations | A separate project |
| One crew working two shifts or moving between locations | One call sheet, with a company move |
| The same day, shared differently with different people | A copied call sheet on another schedule |
Keep a small unit on one call sheet
This keeps everything in one place, and everyone sees the whole day. It works well when the second unit shares the main unit's schedule, talent, and meals.
-
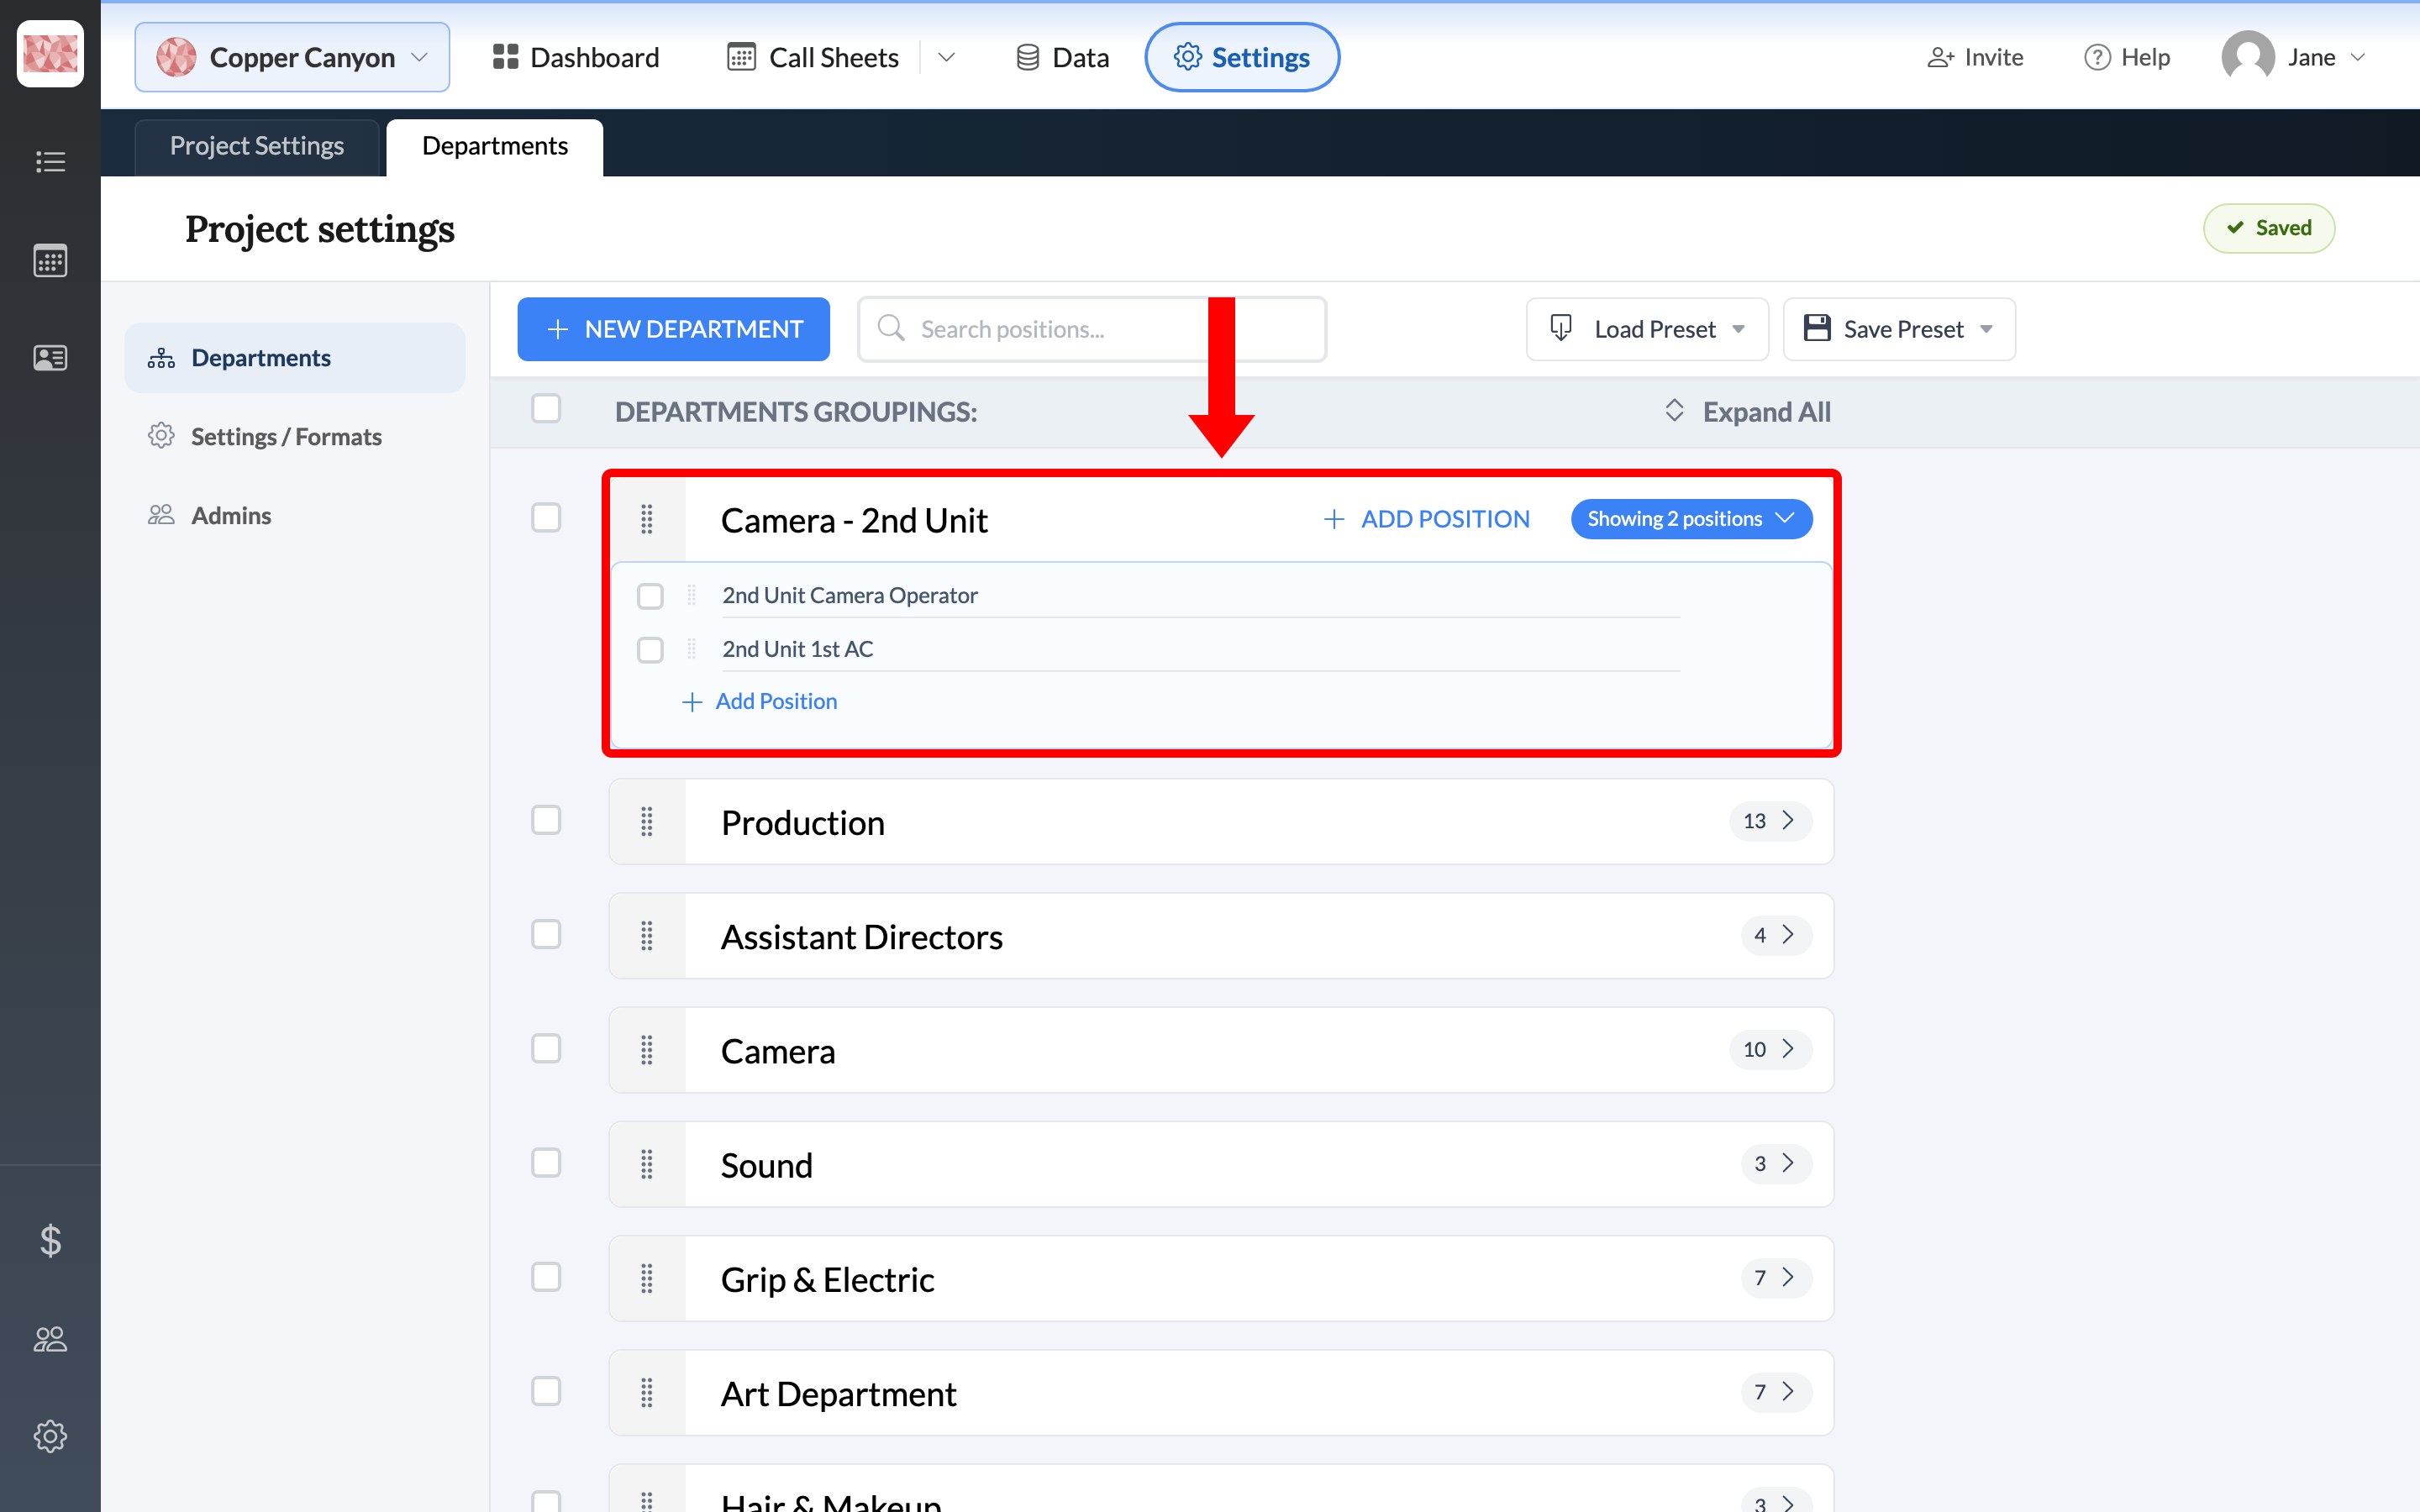
Under Settings → Departments, click New Department and name it something like Camera - 2nd Unit. Set up departments and positions covers adding its positions.
-
Give the second unit's crew those positions. They'll appear under their own heading in the crew list.
-
If they start at a different time, set a department call on that heading. See Set crew call times for individuals, departments, and the whole unit.
-
Label their work so it stands out. On Build today's schedule, add a banner row such as 2nd Unit: Scene 12, or add a custom banner anywhere on the call sheet.
Everyone receives the same call sheet with this setup. If the units need different locations or schedules, use a separate schedule instead.
Show two units on one schedule
You can run two units through the same Today's Schedule, with each unit in its own color and a divider between them. Everyone sees both units' days on one call sheet.
-
Label the first unit. Open Build today's schedule, click Add Banner, and title it something like
▼▼▼ UNIT 1 ▼▼▼. Clear the banner's time, and keep it as the very first row. You can copy the arrows from here.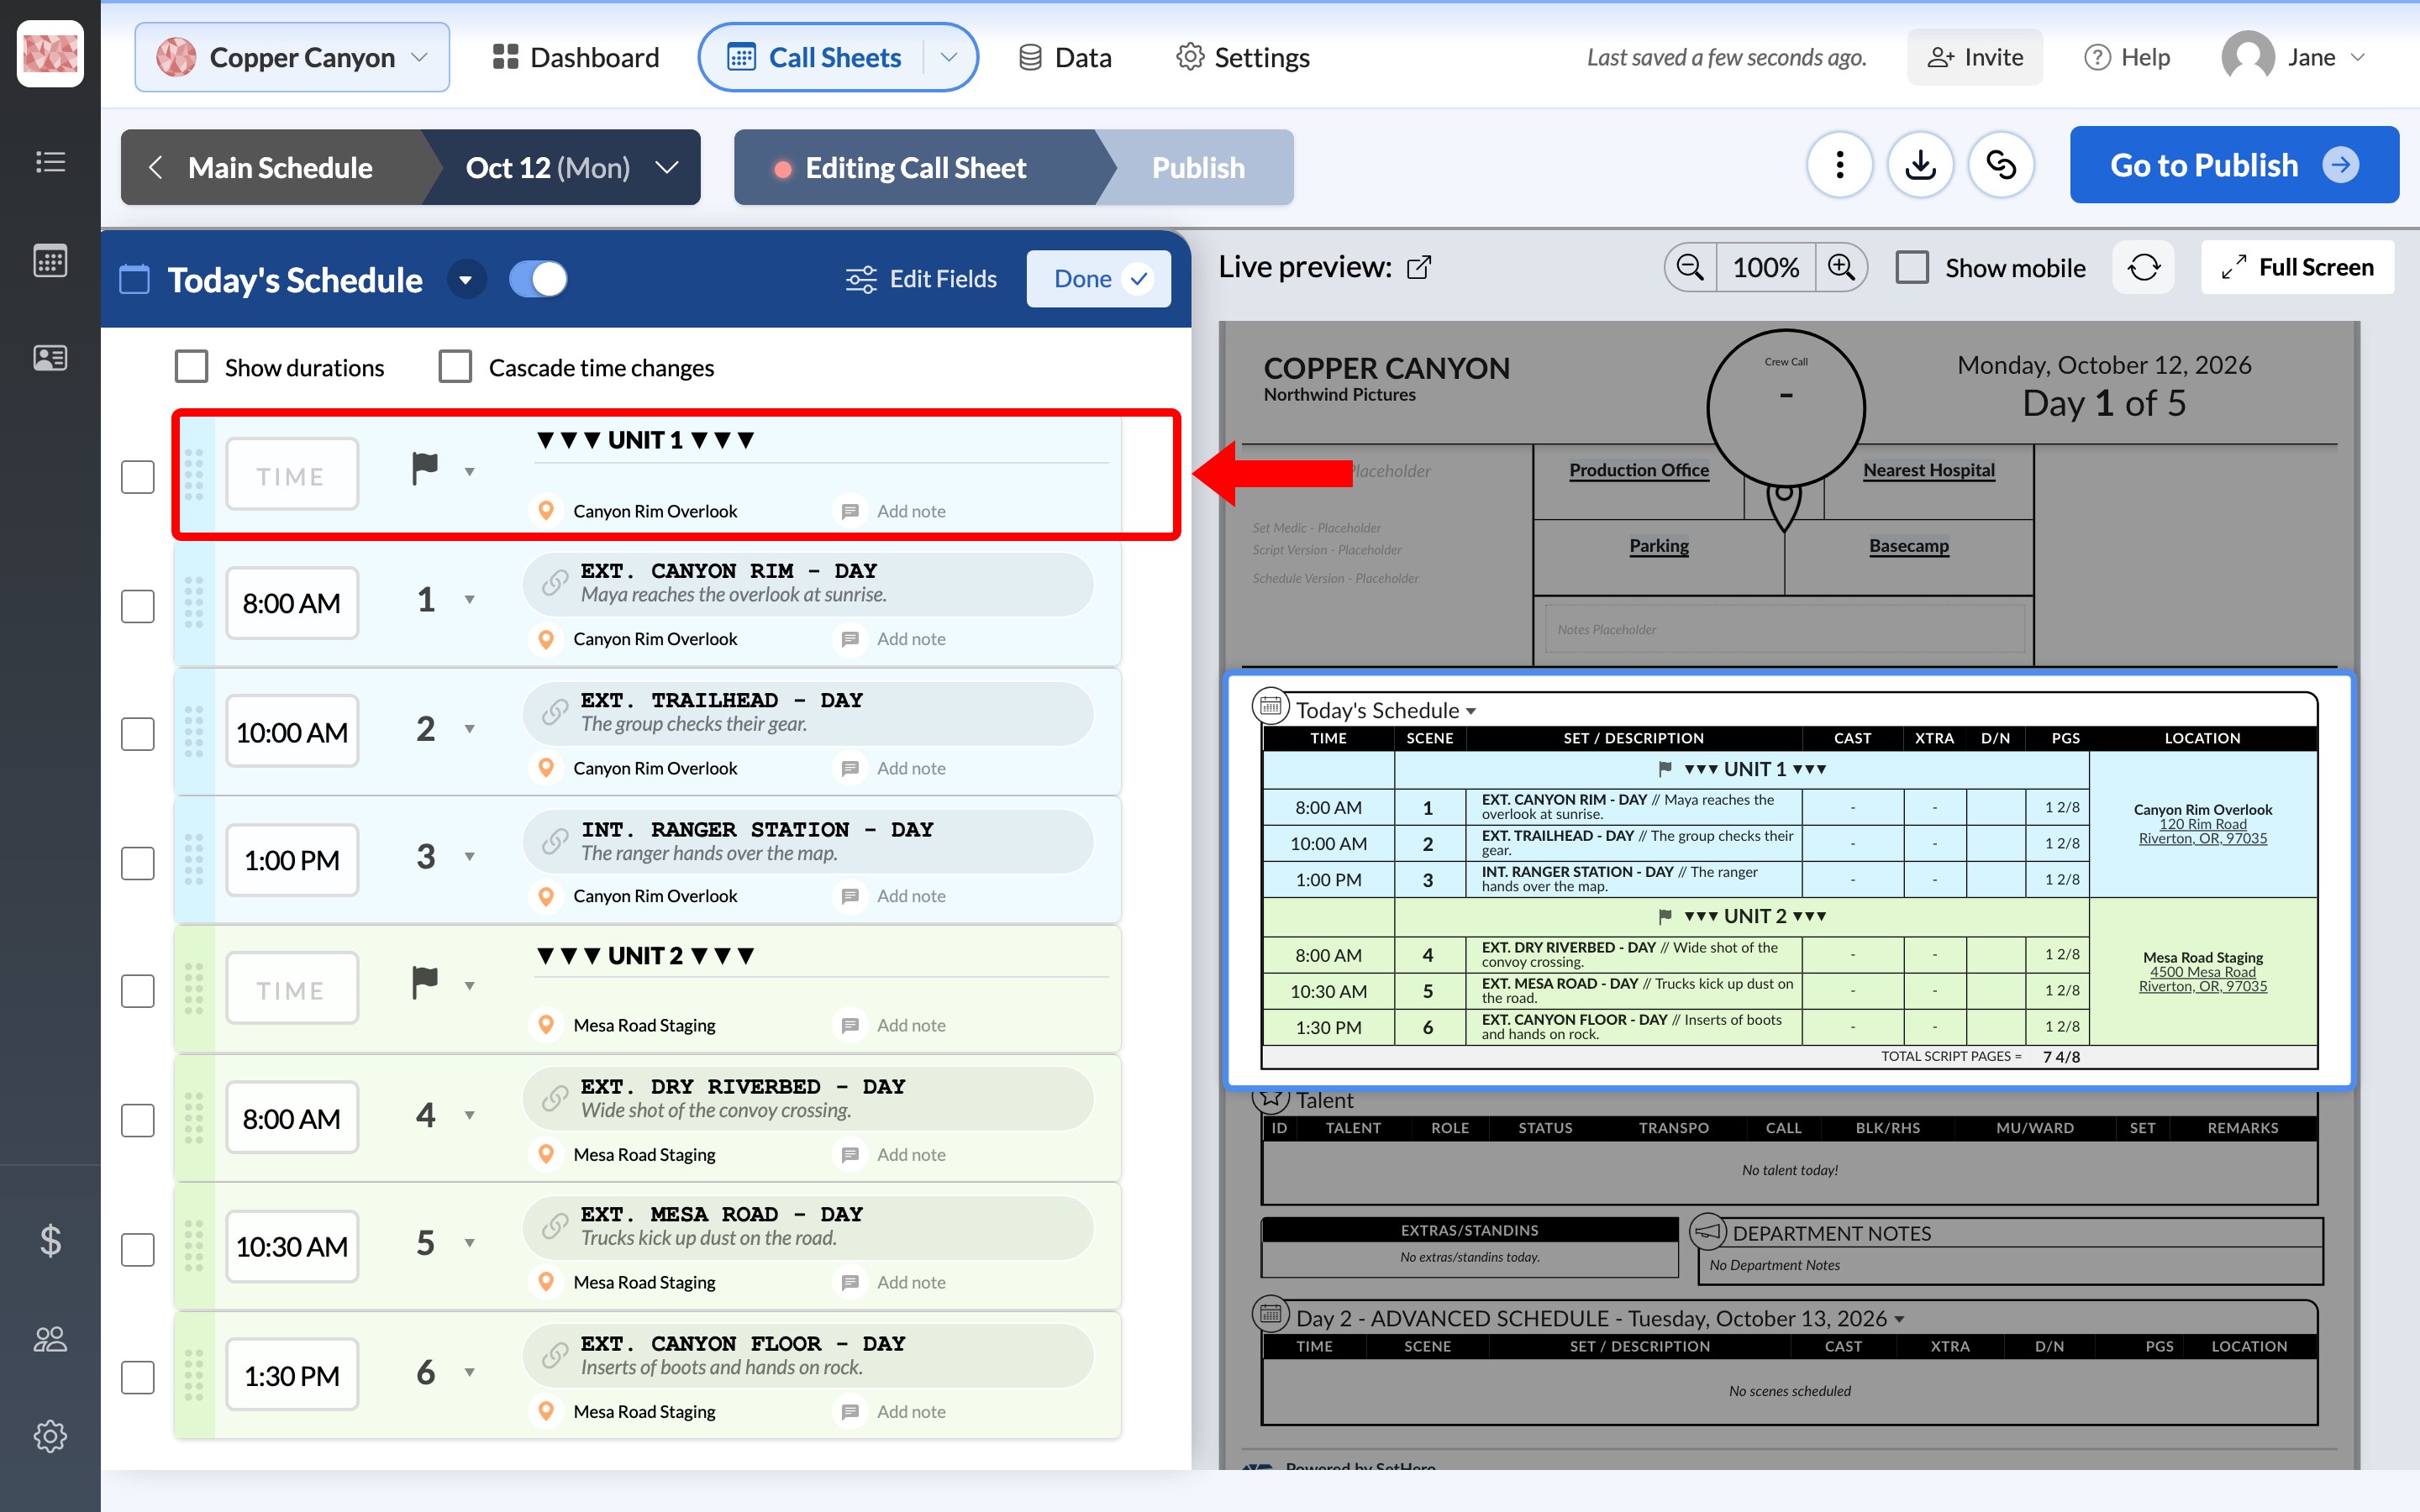
-
Add the first unit's work. Add its scenes and times. Then hover over the eyedropper on each of its rows, including the banner, and choose the same color.
-
Set the first unit's location. Click the location on each of the unit's rows, including the banner, and choose where the unit is working.
-
Add the divider. Click Add Banner again, title it
▼▼▼ UNIT 2 ▼▼▼, clear its time, and choose a second color.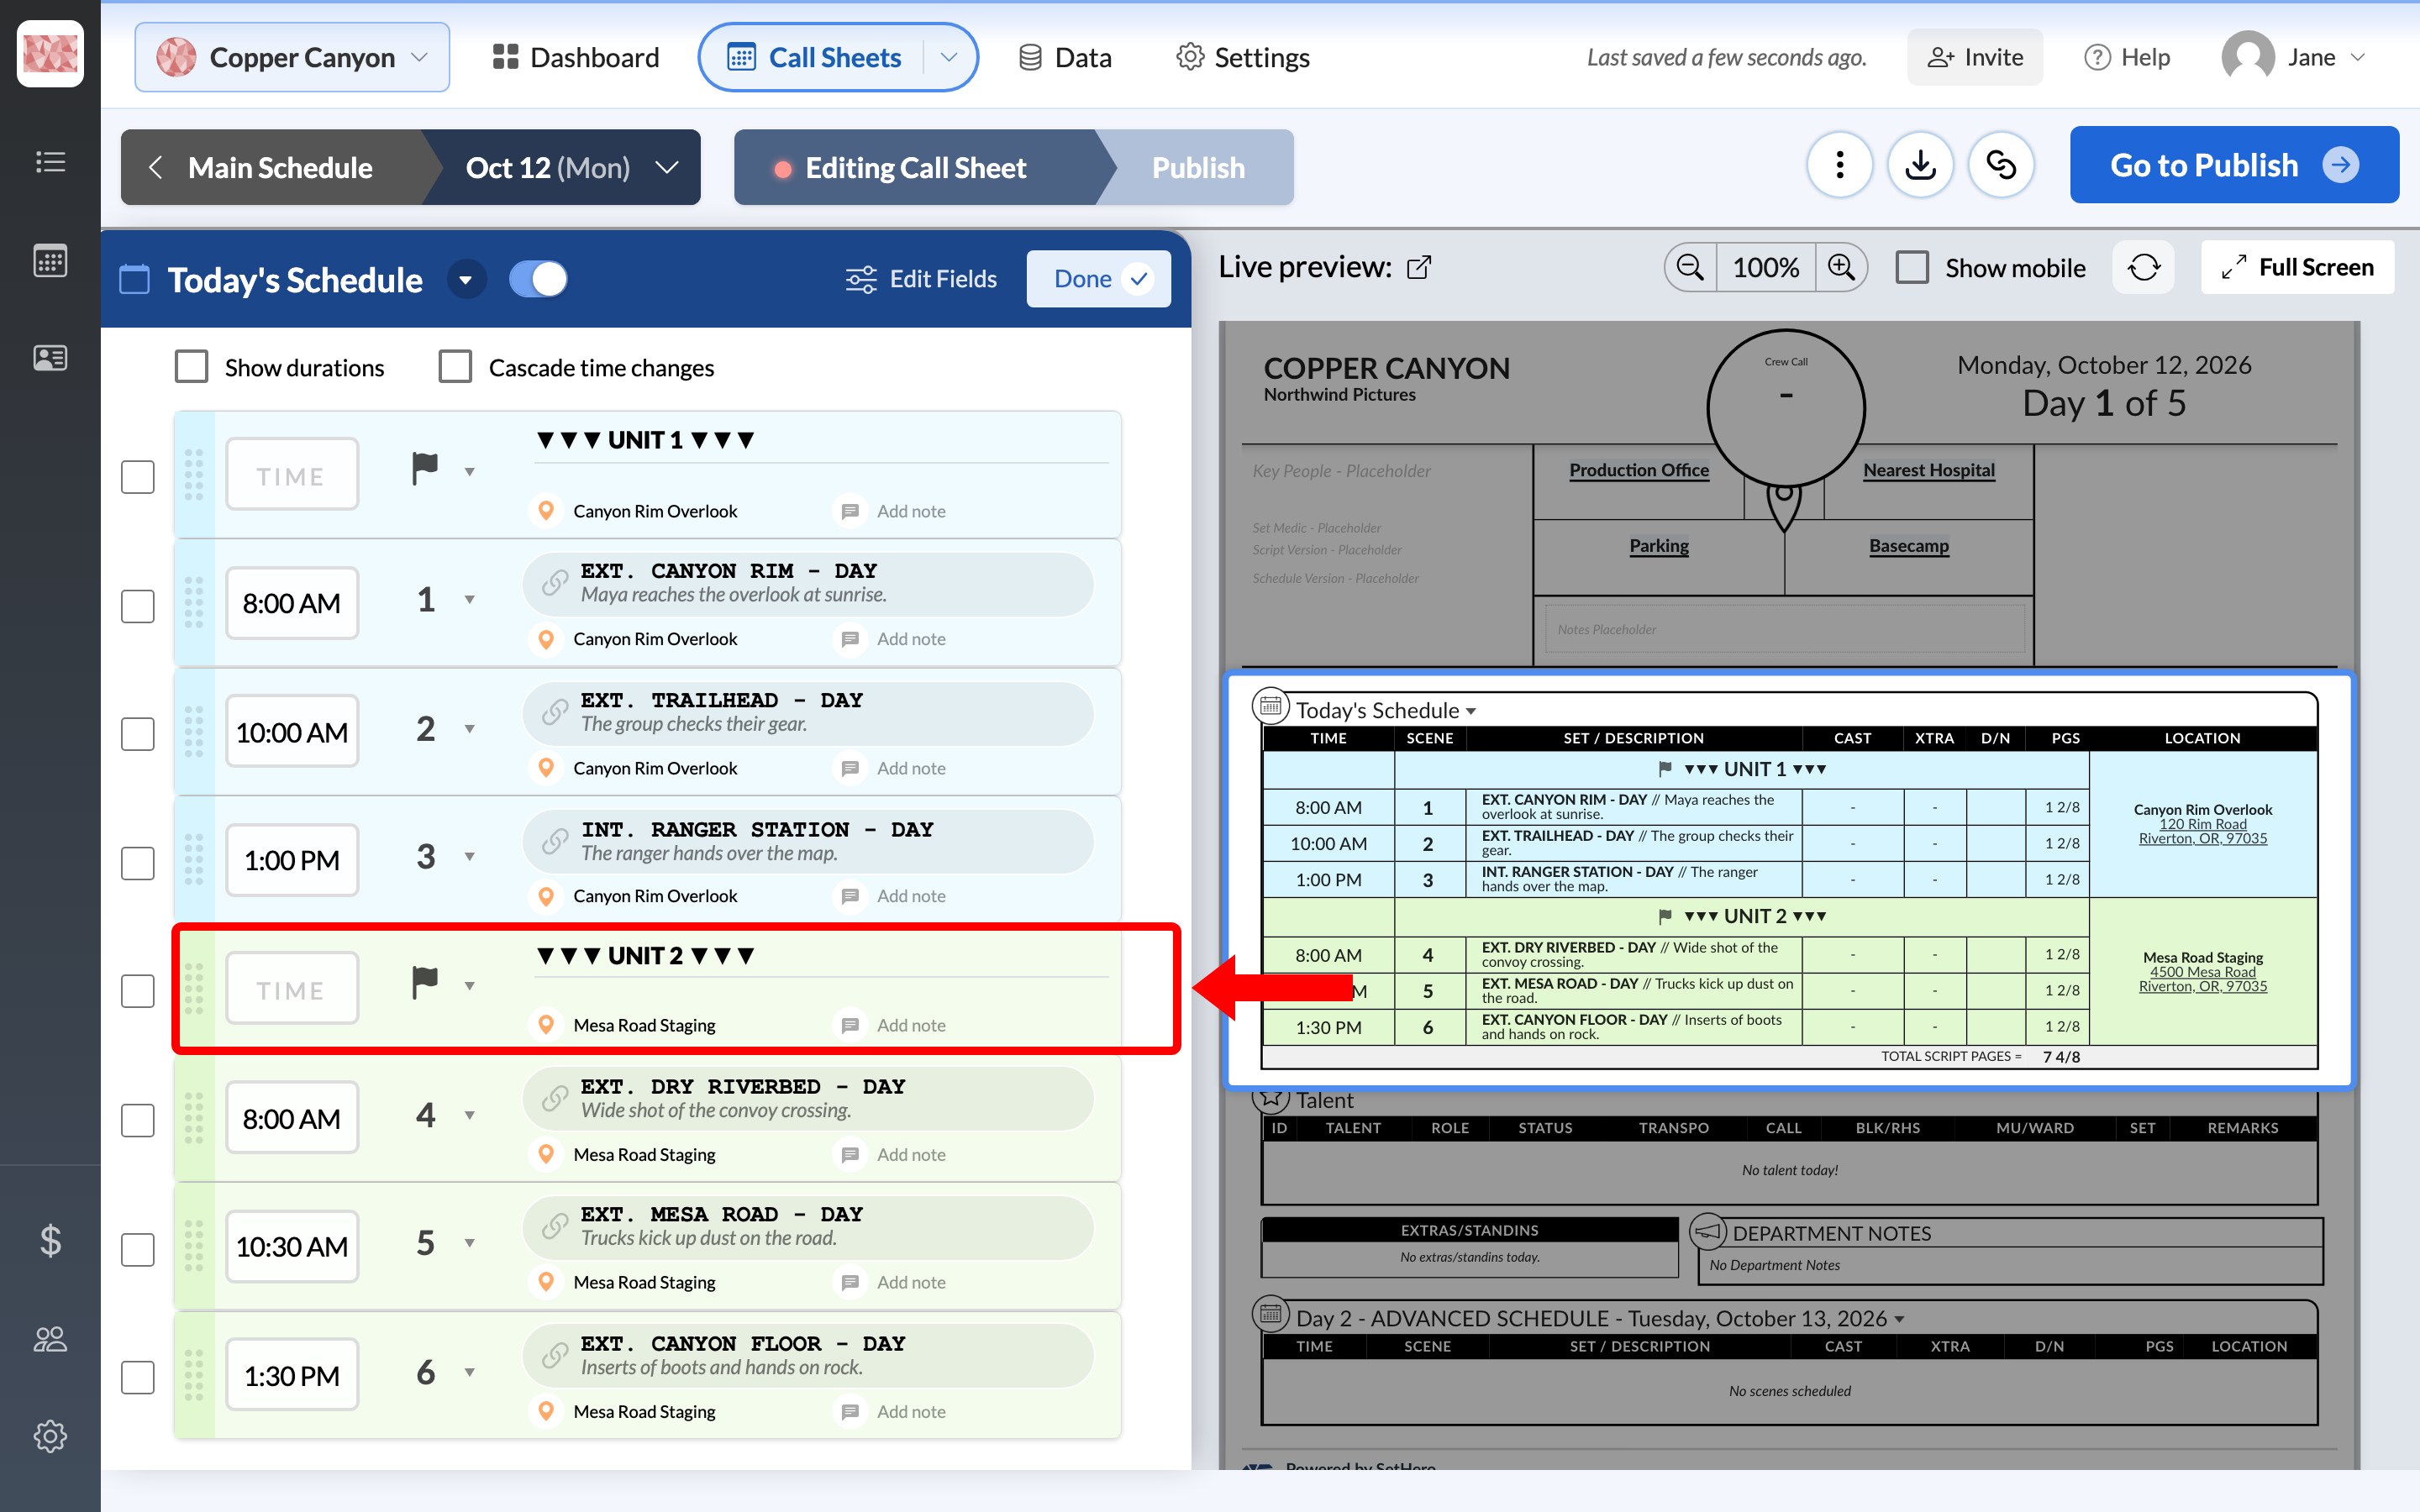
-
Add the second unit's work. Add its scenes in the second color, give its rows their own location, and start the times over from the beginning of its day.
On the call sheet, the two units read as separate blocks, with the rows in the order you placed them. When a unit's rows share a location, it appears once beside the whole unit.
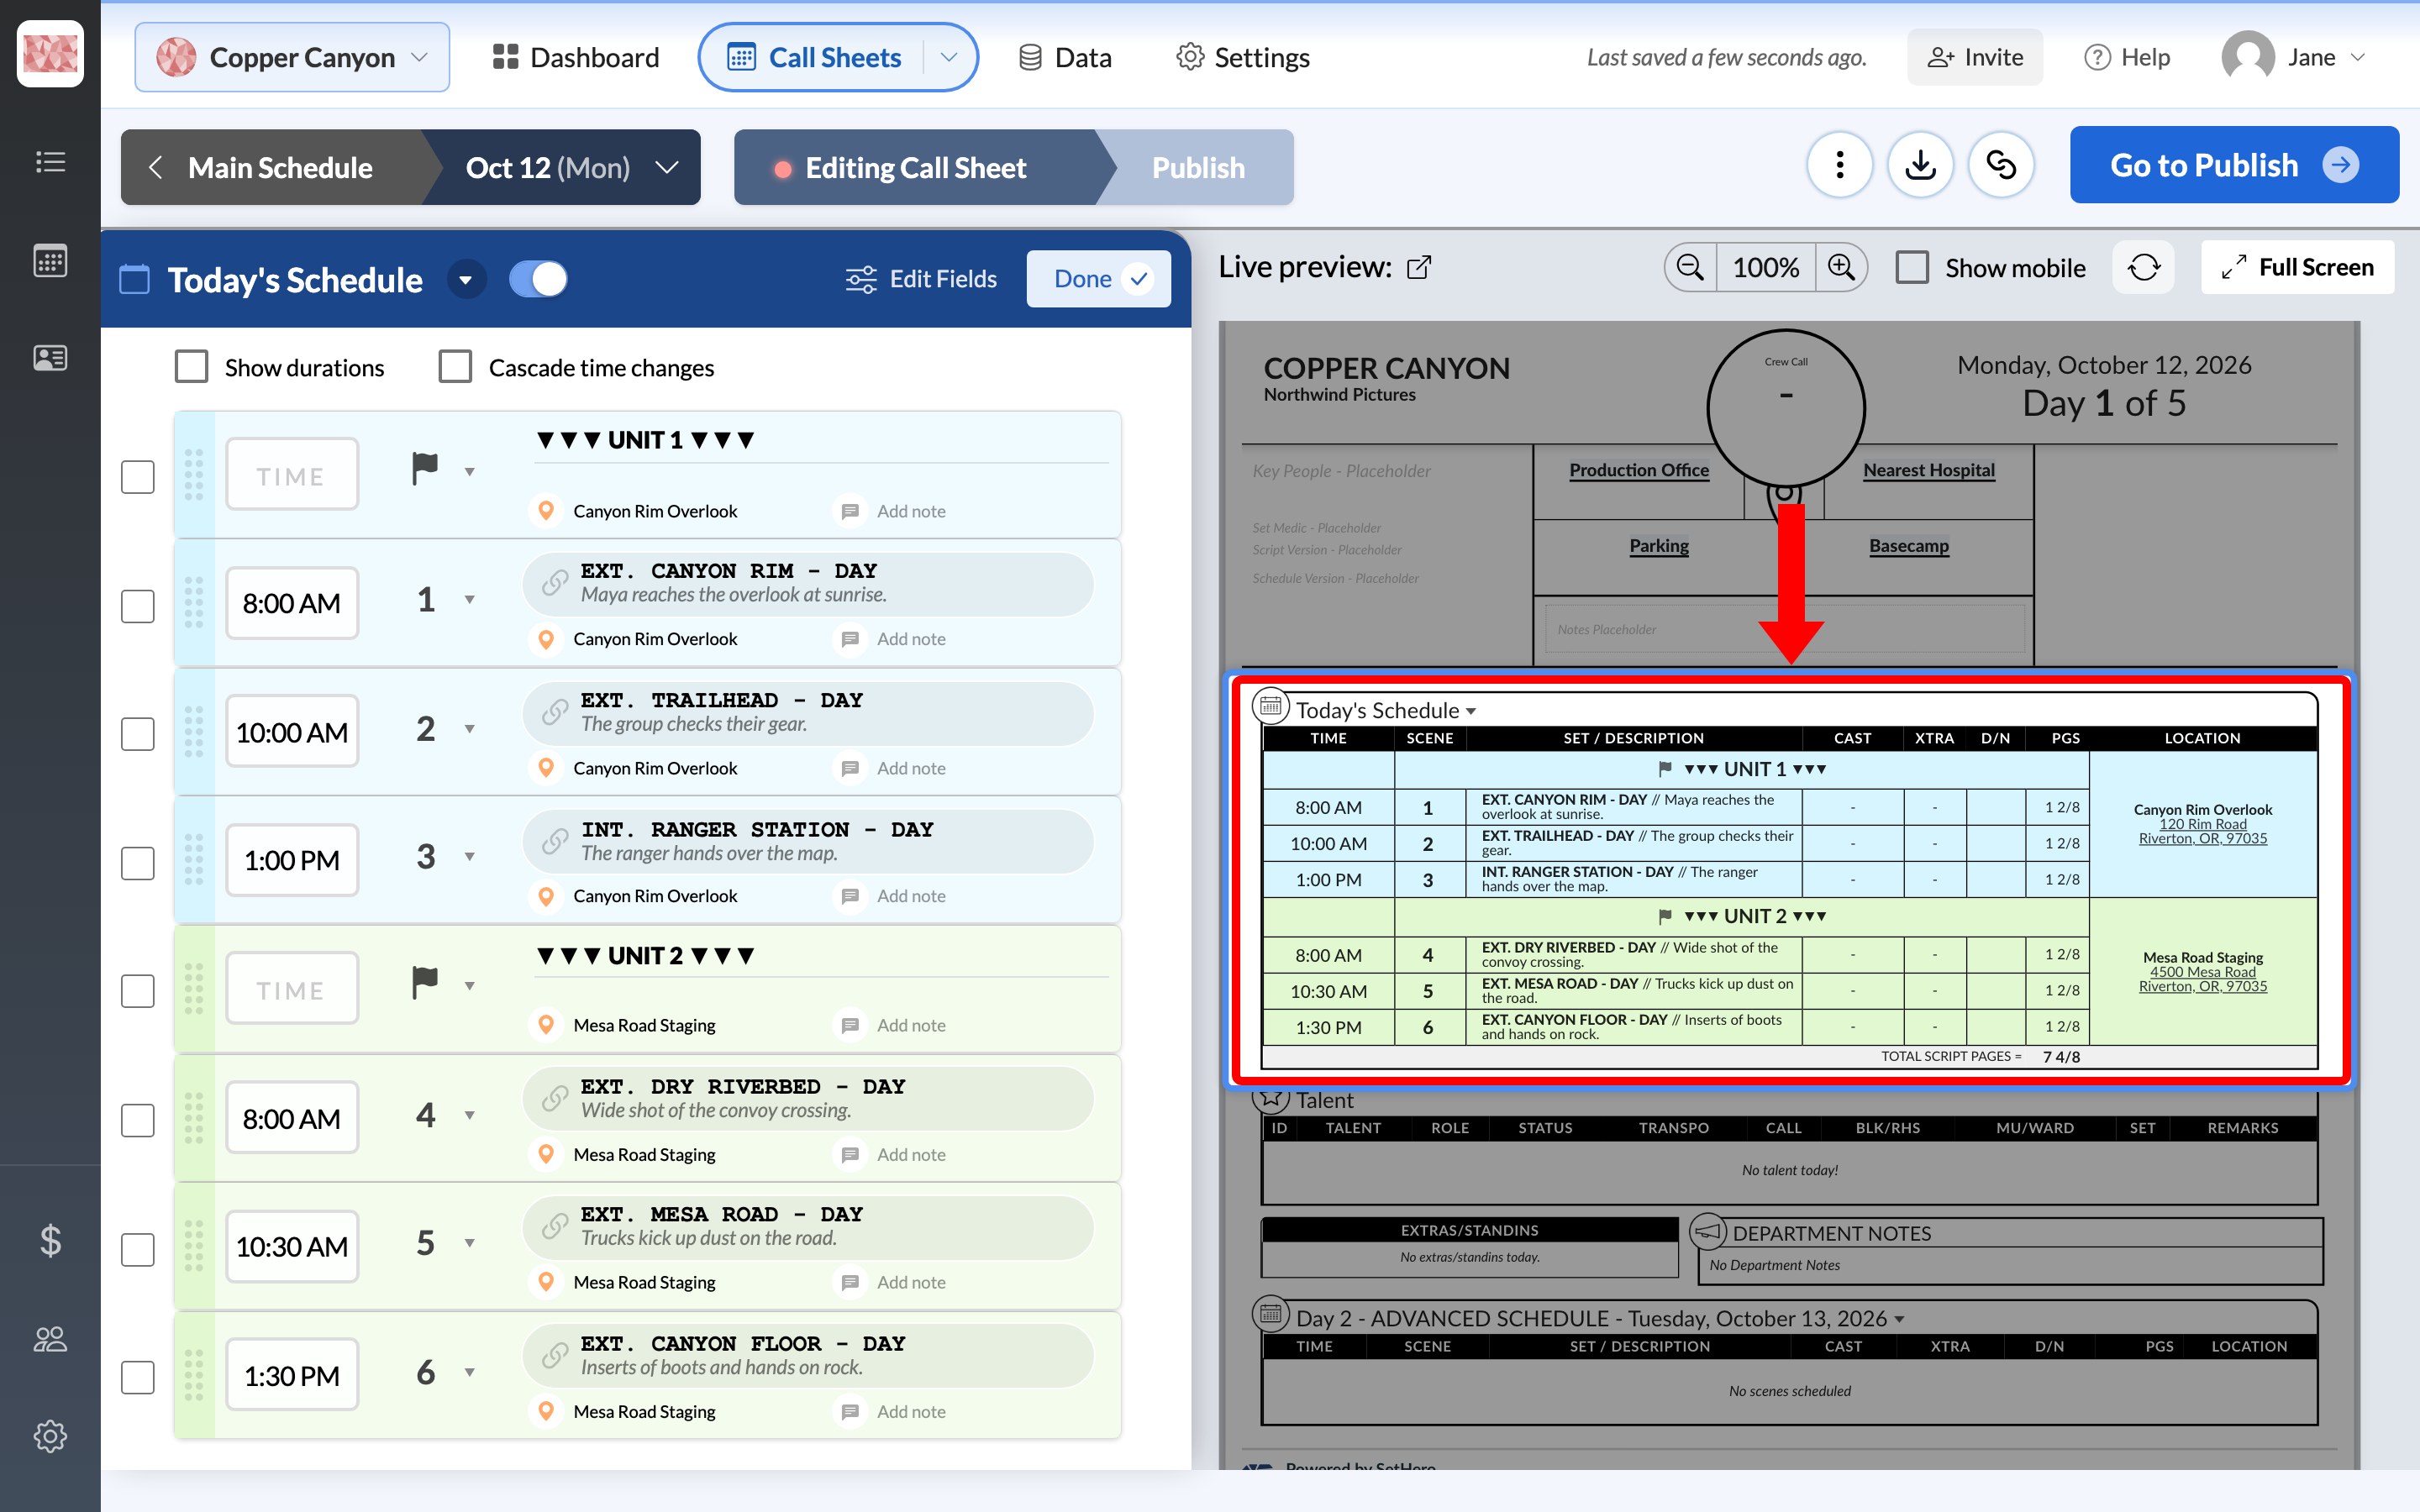
Important: Leave Cascade time changes off for this layout. It recalculates each row from the row above, which would overwrite the second unit's restarted times.
The Total Script Pages figure at the bottom of the schedule adds up both units. A scene's location saves with the scene, so changing it here also changes it anywhere else you use that scene.
Give a unit its own call sheet
A separate schedule in the same project gives the unit its own call sheets, while keeping your people, scenes, and locations in one place.
Set up the schedule
-
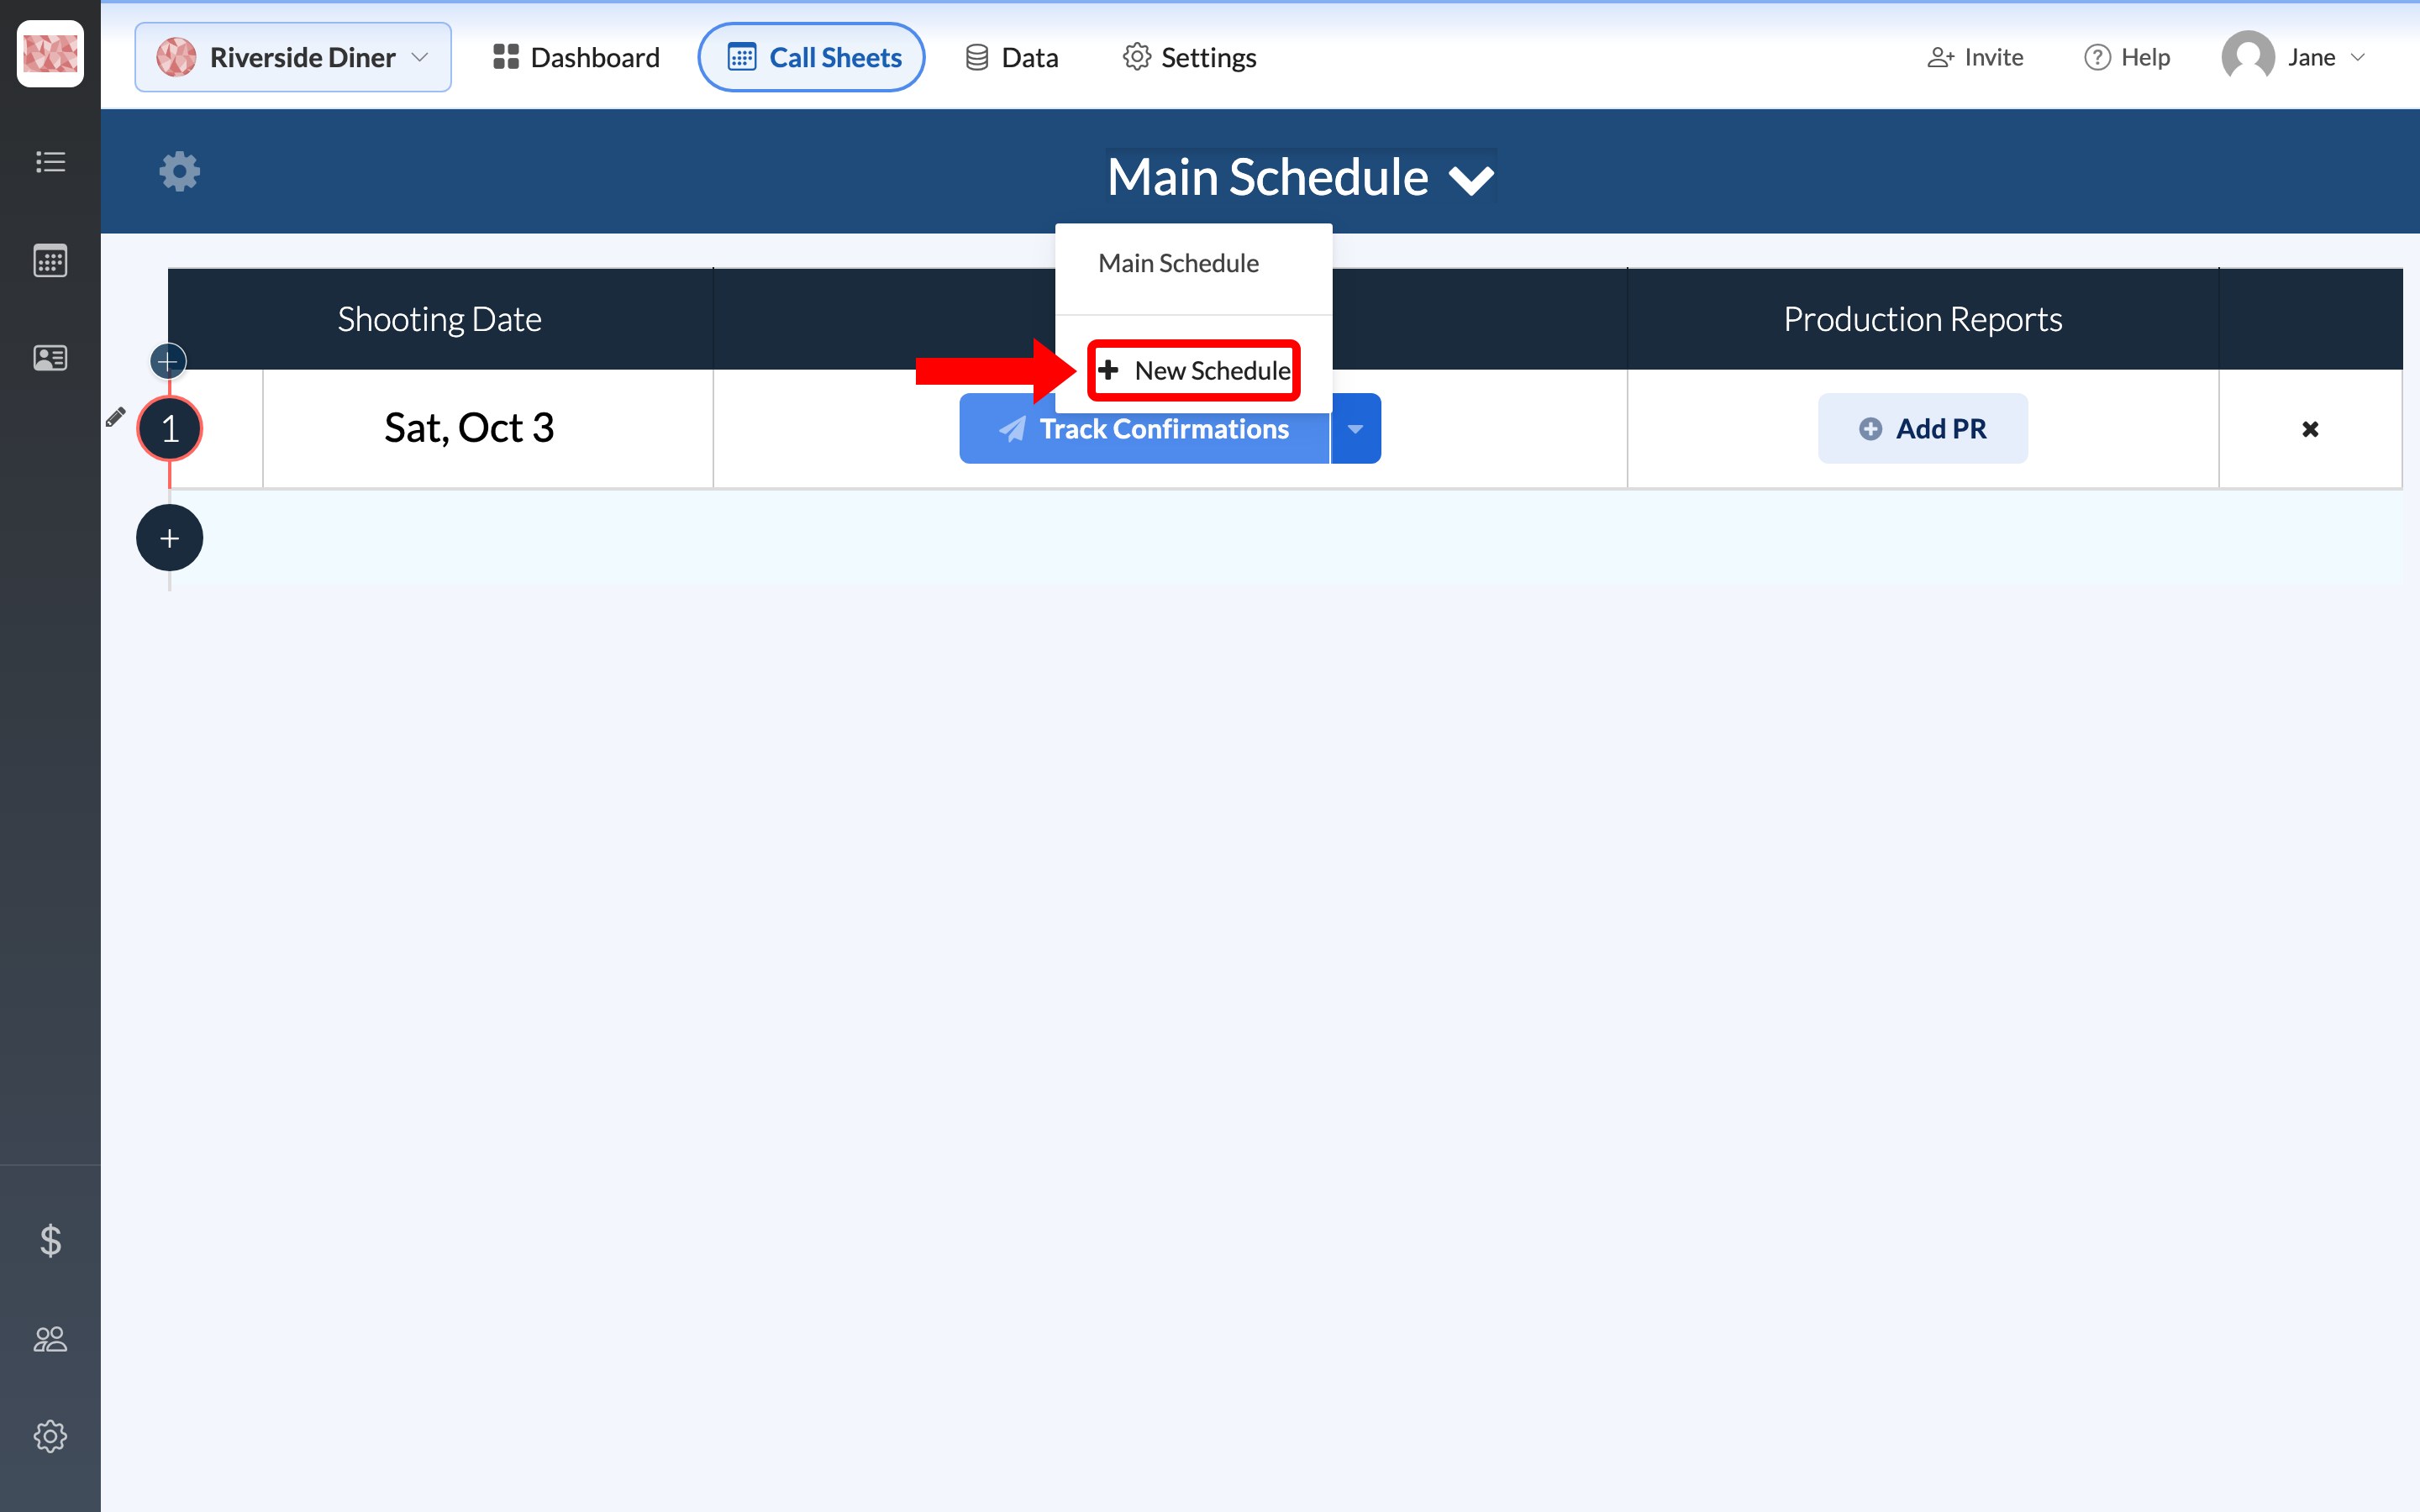
Open Call Sheets, click the schedule's name, then click New Schedule.
-
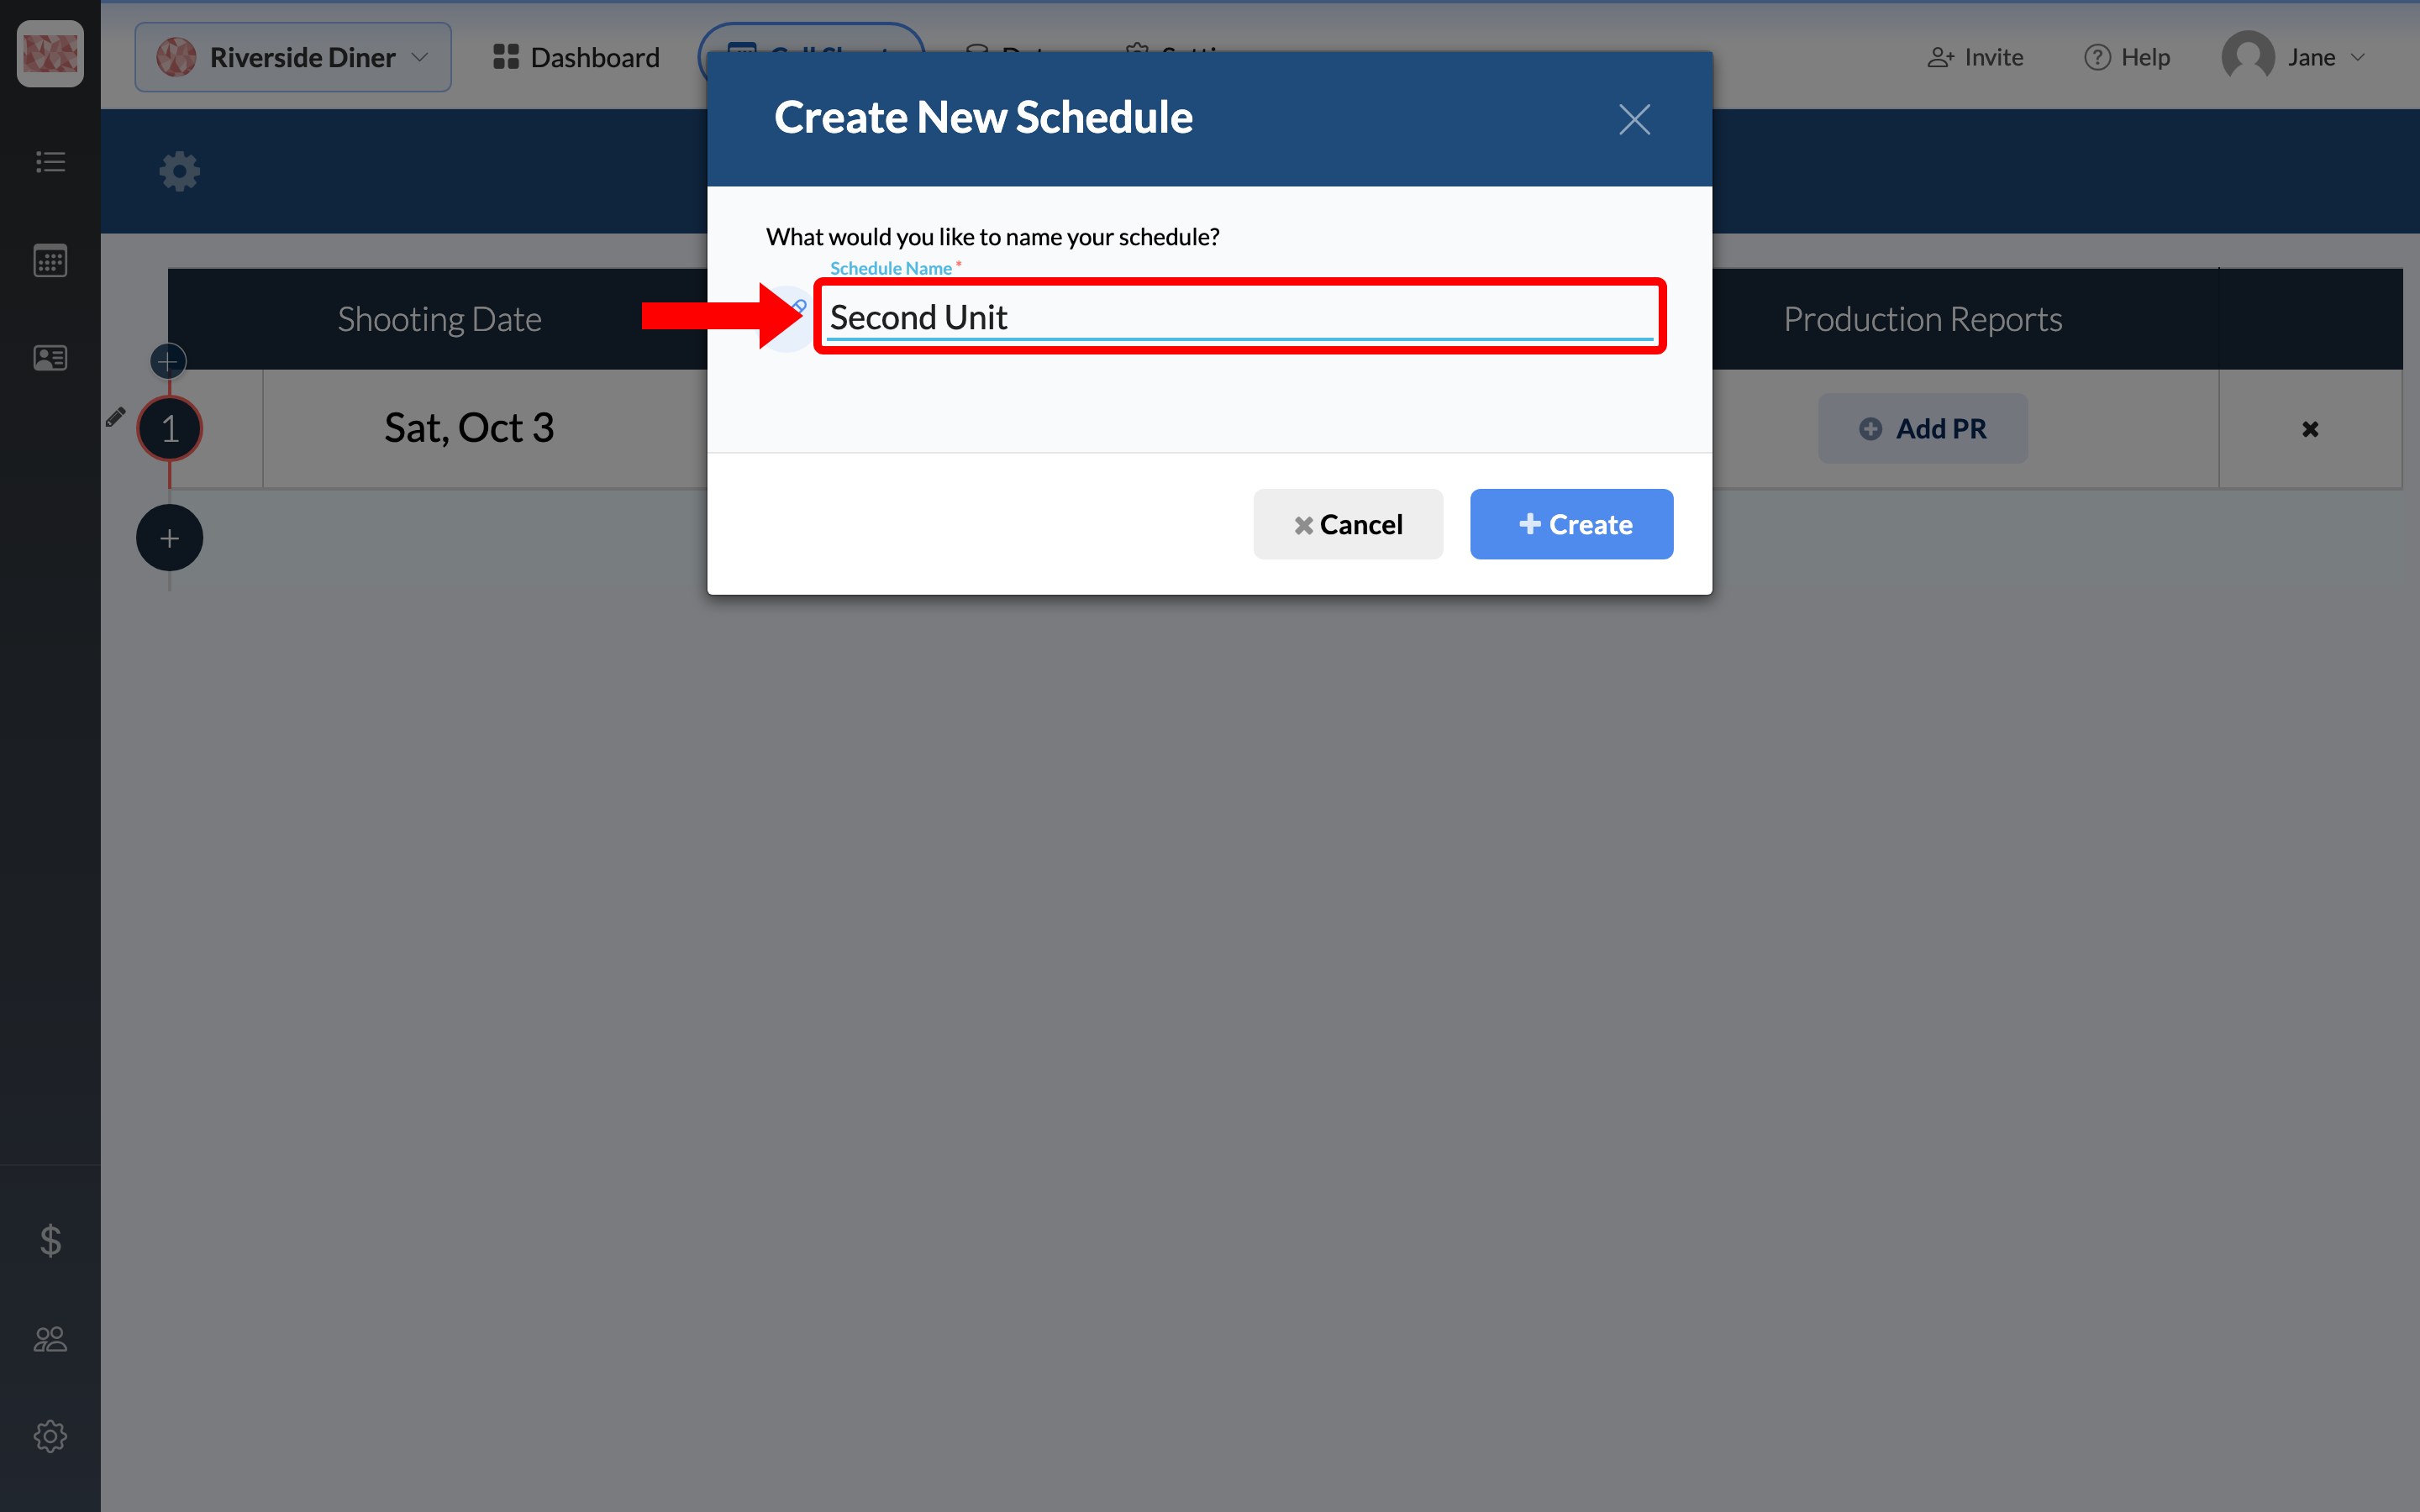
Name it Second Unit and click Create.
-
Add the unit's shoot days. Using the same dates as your main schedule is fine. Set up shooting days from an empty schedule covers this.
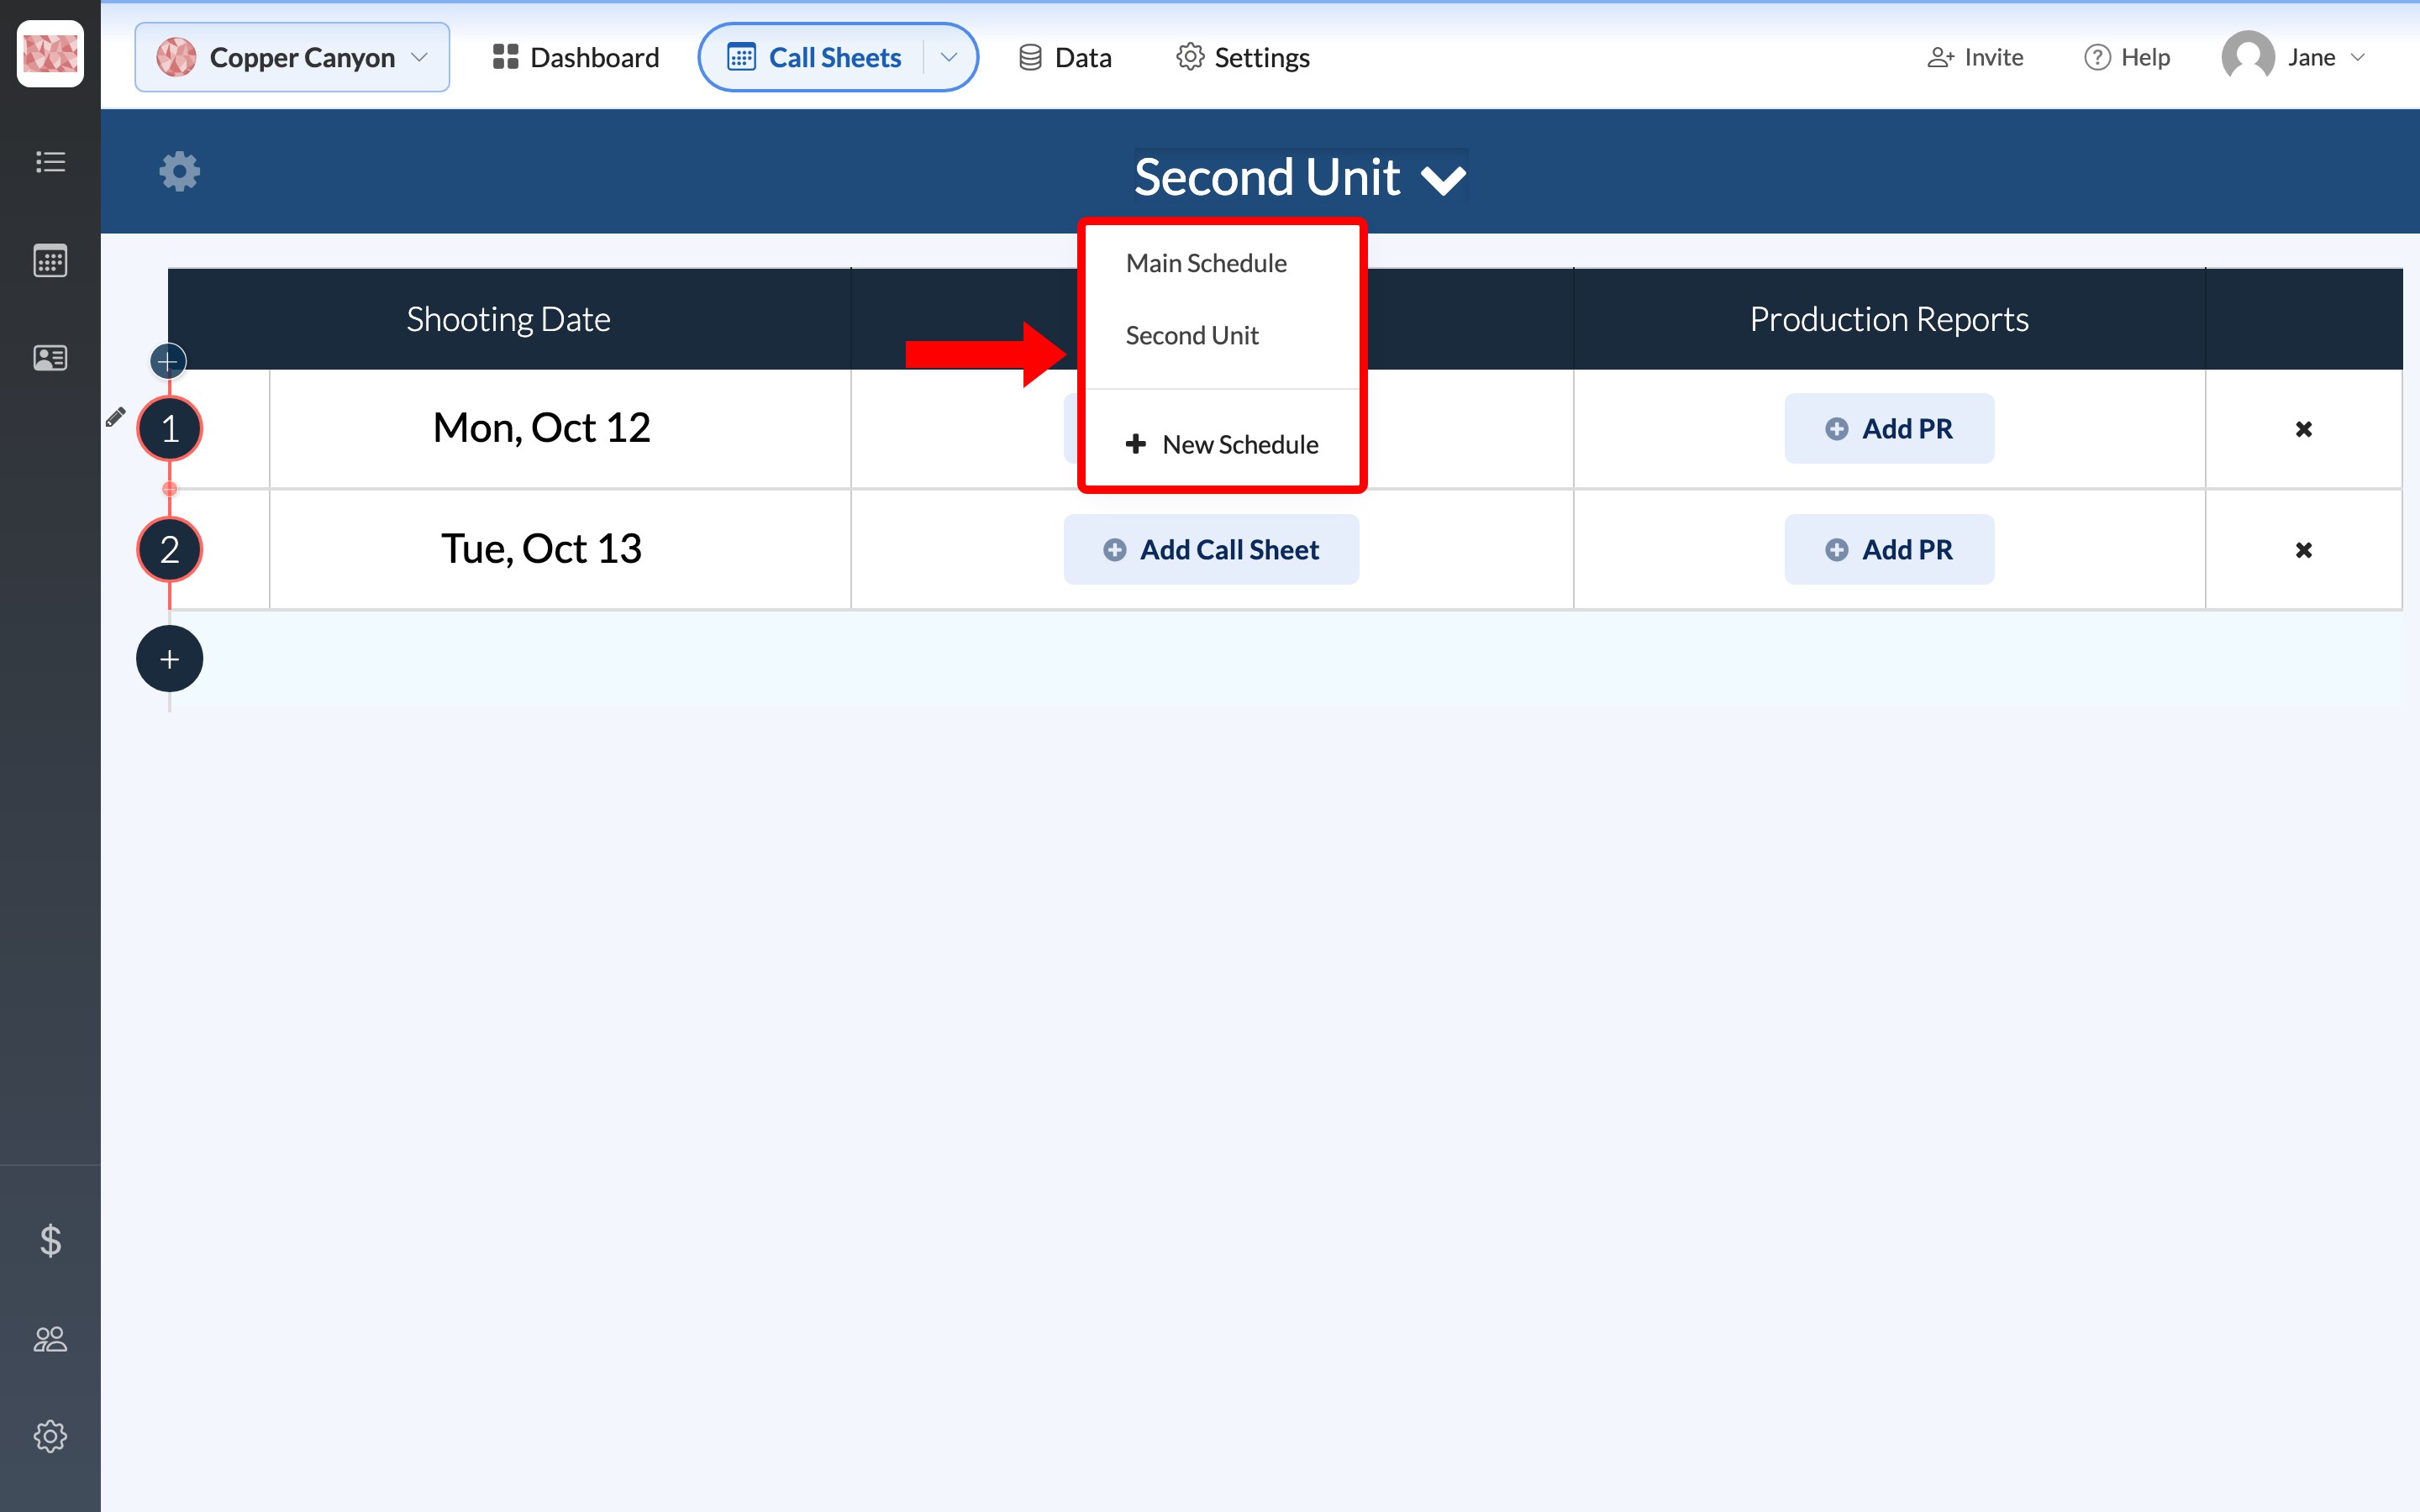
Switch between schedules from the same dropdown.
Start from the main unit's call sheet
Copying saves you from rebuilding the day:
-
On the main schedule, open the menu beside the call sheet's Edit button and choose Copy / Move.
-
Leave Copy this call sheet selected, and choose a day under Schedule: Second Unit in the list. Only days without a call sheet appear.
-
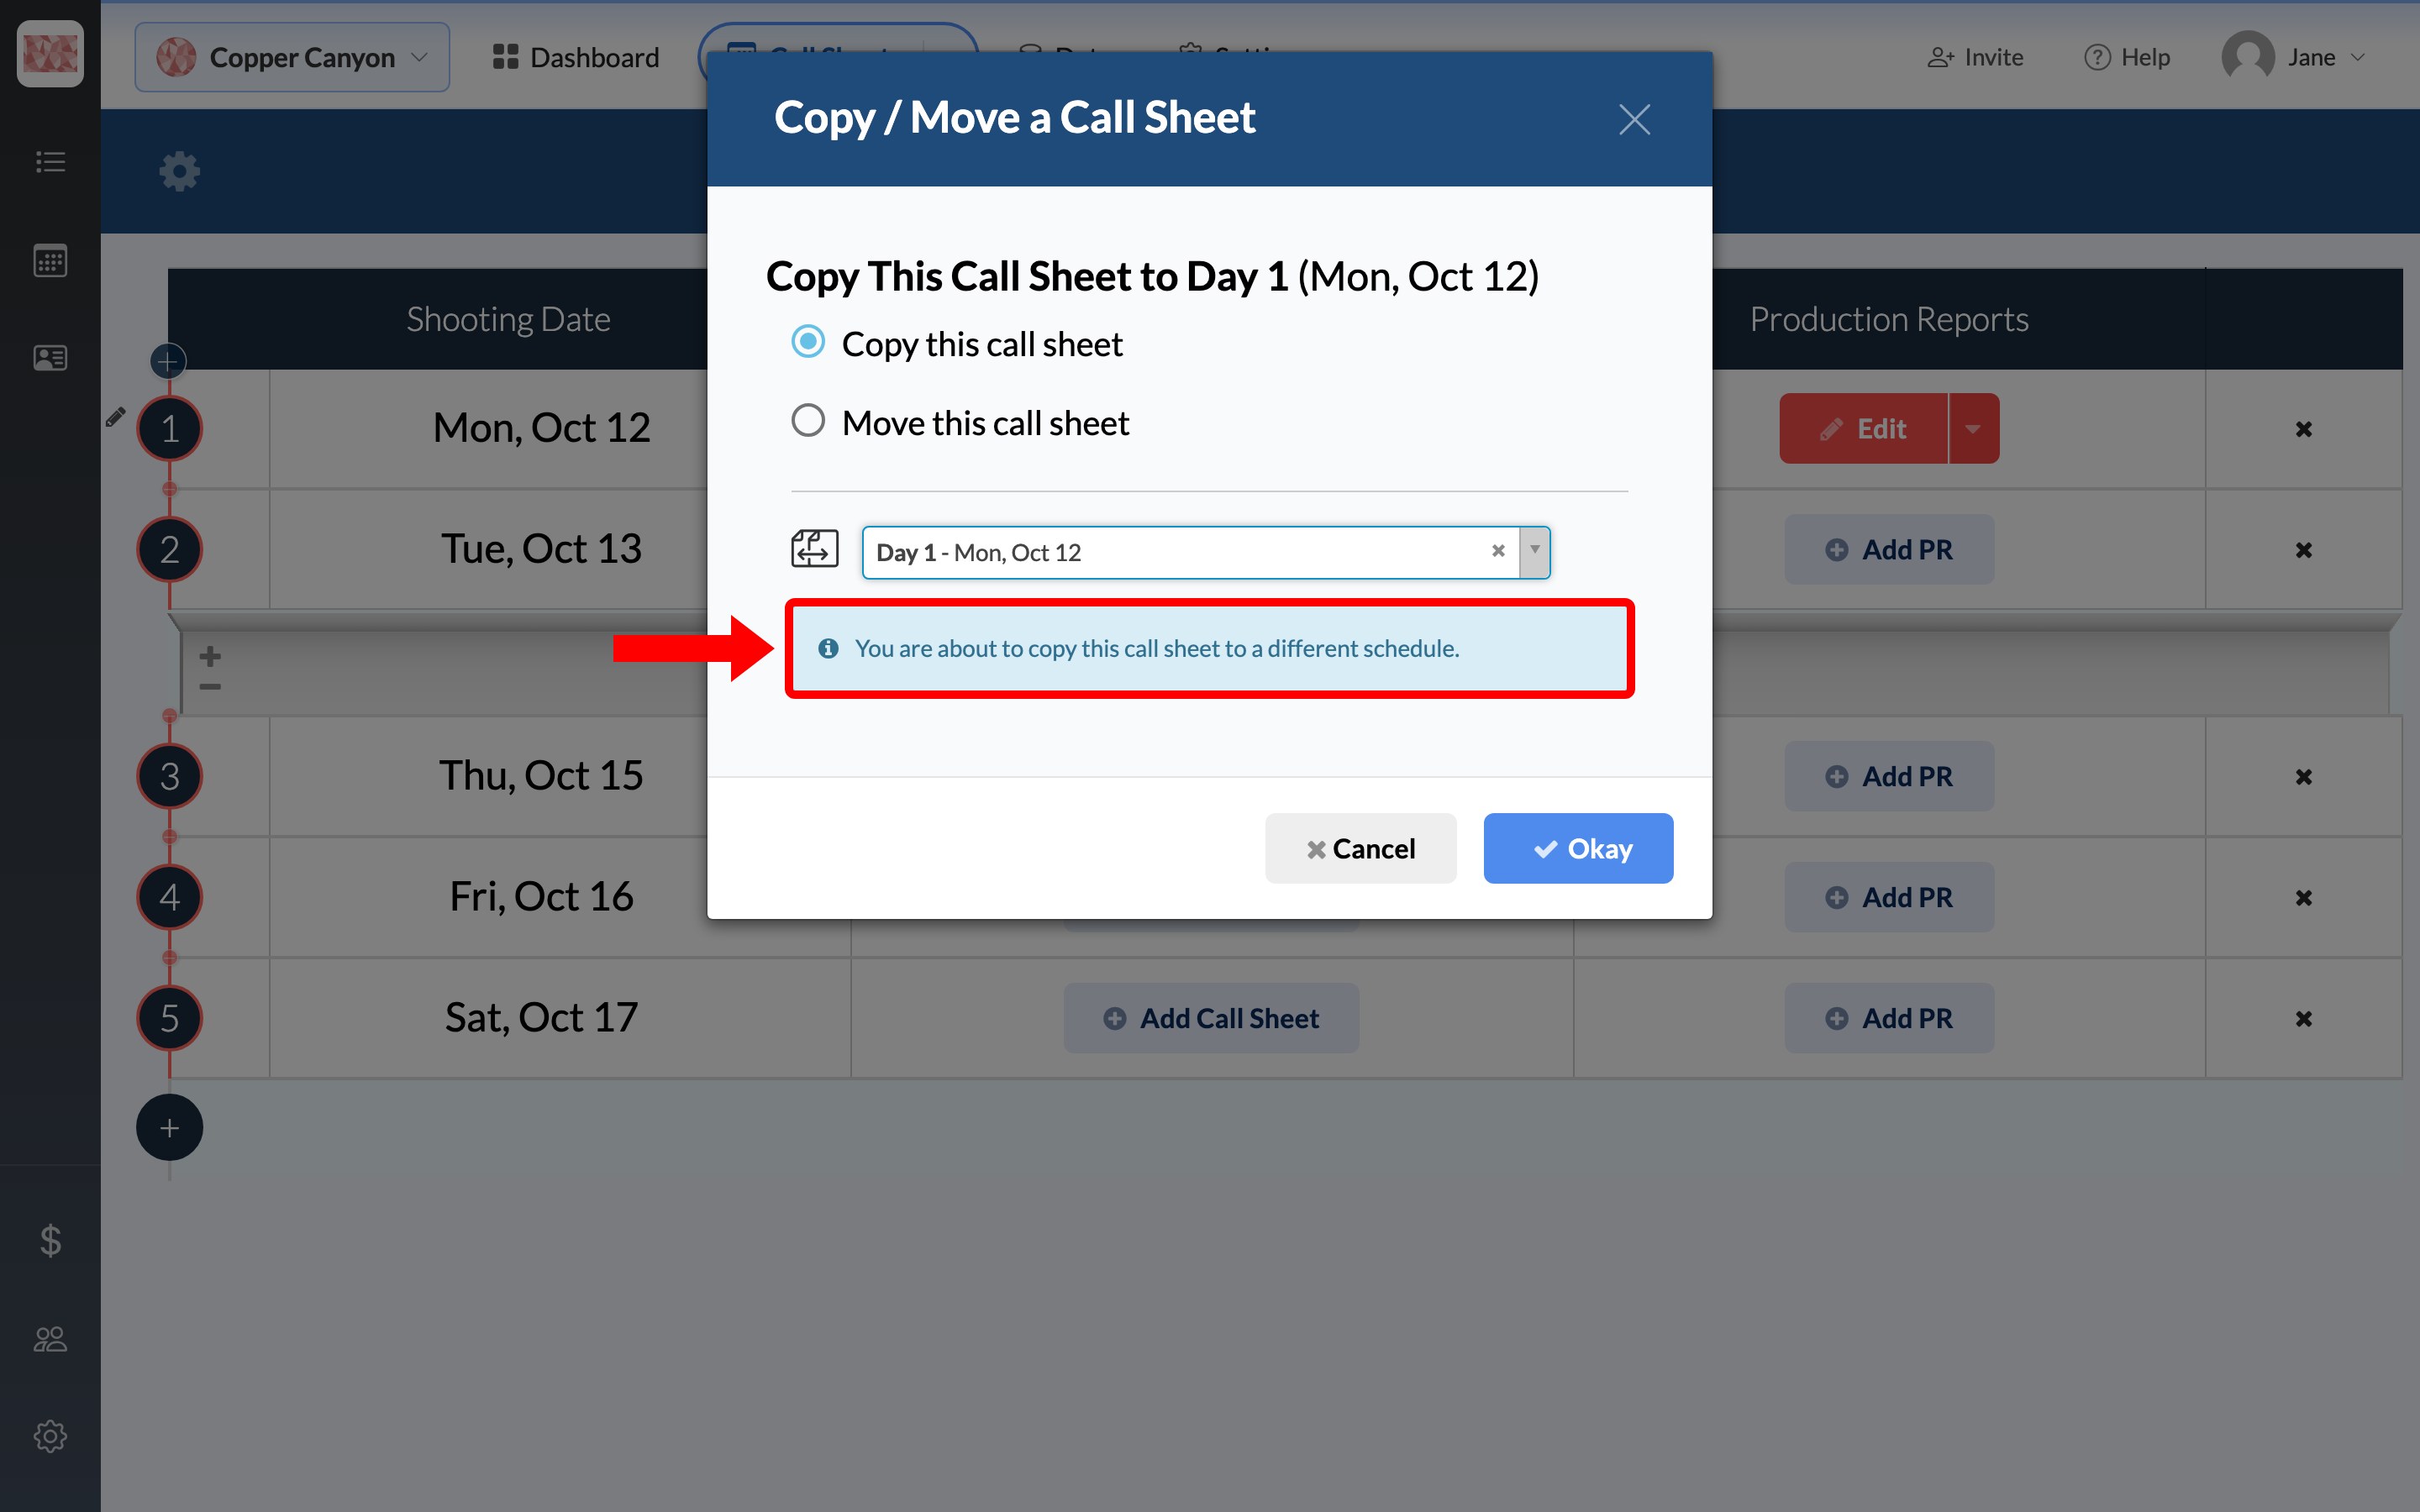
Check that SetHero says the call sheet is going to a different schedule, then click Okay.
Make it the unit's own
- Change what's different: update the times, scenes, and locations.
- Hide anyone who isn't working: use the eye icon in the Crew section instead of removing them from the project.
- Label it: both call sheets show the same project title, so add a custom banner such as 2nd Unit to help crew tell them apart.
- Send each one separately: you choose recipients for each call sheet. Someone working both units needs to be selected on both, and they'll get both. To check how that looks, send yourself a test.
What each schedule keeps separate
| Shared across the project | Separate for each schedule |
|---|---|
| People, scenes, and locations | Shoot days and day numbers |
| Departments and positions | Call sheets and production reports |
| Project settings | The production report recipient list |
Tip: Days are counted by calendar date, so a second unit shooting on the same date as your main unit shouldn't add another day to your limit. See Project size limits: people and days.
Use a separate project
If a shoot shares little beyond your company name, such as a different crew, script, and locations, give it its own project in the same company. This also keeps its schedule from cluttering your main production.
Contacts belong to your company, so you can reuse the same people with Import crew and talent from a previous project. Scenes and locations belong to each project. To start with everything from an existing project, see Duplicate an existing project.
Run a split day on one call sheet
When one crew works both parts of the day, one call sheet is usually clearest. The call sheet can't show two separate days or two general call times, so show the split with these tools:
-
The start of the day: set Call Time and Shooting Call for the first part. See Setting the call time, shoot time, and wrap time.
-
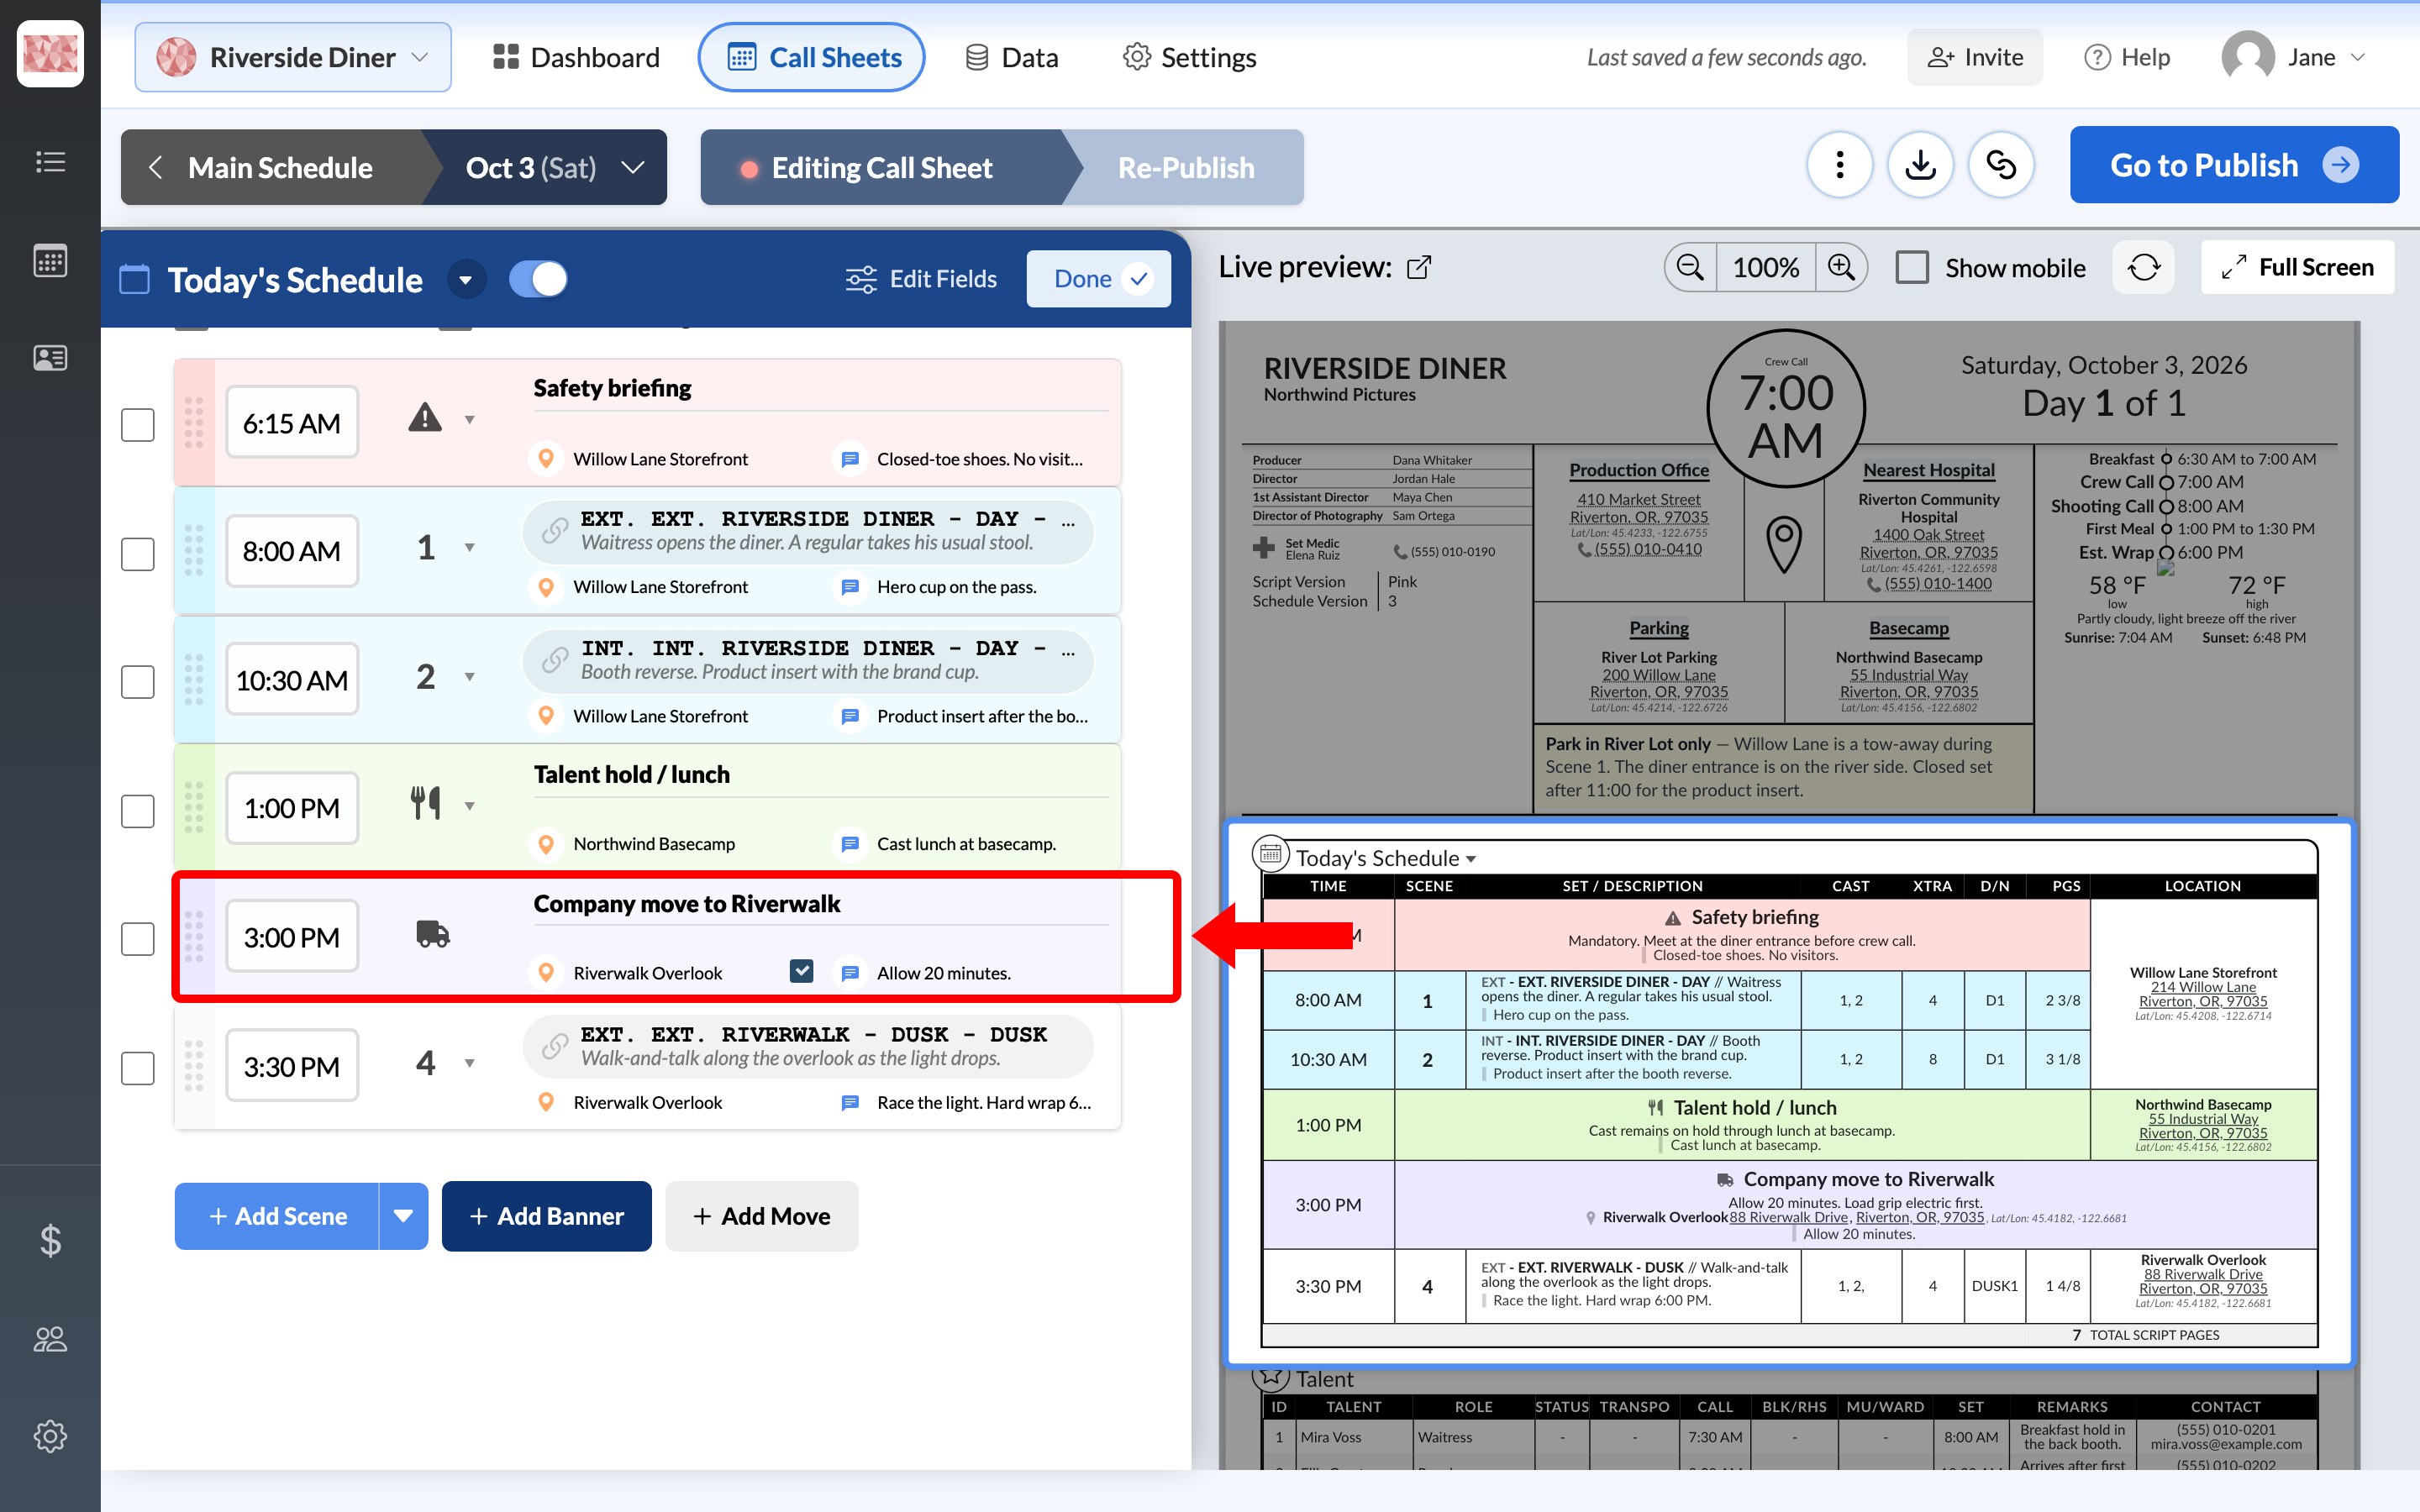
A change of location: on the schedule, click Add Move, set the destination as its location, and use its note for details such as how long to allow.
-
The break between parts: add a banner row, such as Night shift call, at the time the second part starts.
-
Anyone who starts later: give them an individual or department call time. See Set crew call times for individuals, departments, and the whole unit.
-
Where to go: add the second location to the top of the call sheet with + Add New Row.
-
Instructions for the whole crew: spell out the plan in the Main notes block, since everyone sees the same locations and parking details.
If two groups really need separate times and locations, use a separate schedule instead.
Send different versions to different people
If a group shouldn't see the full call sheet, such as clients, or cast who shouldn't see a closed location, make a copy for them:
- Create a second schedule with a clear name, such as Client Version.
- Copy the call sheet to it, using the same steps as for a second unit.
- Remove or hide anything they shouldn't see.
- Publish it only to that group.
The copy doesn't update with the original, so make any later changes to both.